

How To Code C++ On Windows
This document details the procedure of getting started creating console-based C programs. Console-based programs are quite simple - they take input from the keyboard (or a file stored on disk) and they produce output to the text-based panel window. Yous will need ii things to create C programs: a text editor to write the source lawmaking for the program and a compiler to convert the source code to an executable file then the program tin be run (on Windows, executable files accept a ".exe" extension). We will apply Microsoft'due south Visual Studio Customs software which provides both a powerful code editor and a C compiler (as these are packaged in the same software, this is chosen an integrated evolution environment, or IDE).
To get started, we demand to install Visual Studio Community. We will then look at two different ways to develop simple panel-based C programs:
OK, let'southward get started past installing Visual Studio Community...
Installing Visual Studio Customs
There are several different versions of Microsoft's Visual Studio - the Community version is gratis and includes all of the necessary libraries and tools that we need to develop C programs. Y'all tin can google "Visual Studio Community" to detect out more than, or get directly to the relevant page on Microsoft'southward website:
Make sure "Windows" is selected and click on the "Download VS Customs 2017" button as shown below:
In one case you click the "Download VS Community 2017" push, y'all will be prompted to save a file called "vs_community_<some numbers>......exe" - save this file somewhere convenient such as your Desktop:
Just double-click on this downloaded file ("vs_community_<some numbers>......exe"). This will launch the installer programme (yous may be prompted to confirm to "Run" this plan), in which instance merely click "Run":
In the commencement stage of the installation a number of files will exist downloaded to your computer. You lot volition just need to be patient until this stage is complete:
In the second stage of the installation you volition be shown the configuration options below. At that place are several tabs along the top - you just need to look at the default tab which is chosen "Workloads" as shown below.
IMPORTANT: Make sure that you click the "Desktop development with C++" option as shown beneath:
Once you select the "Desktop development with C++" option, y'all volition see a "Summary" shown on the correct hand side of the window every bit illustrated below. Although some of these components are listed under "Optional", information technology is simplest to accept all of the default options as highlighted. Information technology is particularly important that yous ensure "VC++ 2017 Version ... tools" and "Windows 10 SDK" are both selected. Without these you will not be able to compile C programs!
Of import: Make sure that the "VC++ 2017 Version ... tools" and "Windows 10 SDK" options are both selected before continuing:
When you are ready yous tin can and then click the "Install" button in the bottom correct corner of the window. This will start the installer one time over again, and the necessary components will be added:
In one case this is finished, you may be prompted to restart your calculator (click "Restart"):
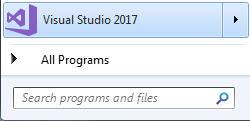
After your computer has restarted, you should find that Visual Studio Community is now installed. To check that the installation was successful, you tin attempt launching Visual Studio. Please note, there is no demand to run the installation program again (this is the "vs_community_<some numbers>......exe" file that you downloaded from Microsoft'due south website). This installation programme is no longer needed. Instead, to launch Visual Studio, you should select information technology from the Start bill of fare as shown:
As this is the first time you have launched Visual Studio, yous volition be asked to "Sign in" (but ignore this if you like by clicking "Not now, mayhap after"), and then you will be asked to select a "theme" (the default theme chosen "Blue" is just fine) so there volition be short delay while the environment is configured for the kickoff time:
And finally, you should see the Visual Studio Customs offset page! Congratulations, you tin now commencement creating your first C program!
You lot accept two options for the procedure of developing your C programs, and these are described below.
Great, now that Visual Studio Community is installed, you have ii options for developing and running C programs on Windows. The kickoff option involves using any text editor you like to write your source code, and using the "cl" command within the Programmer Command Prompt to compile your code. The 2d pick involves using Visual Studio Customs every bit the evolution environment, and creating a Visual Studio "projection" to organise your files.
Both options are described next...
Pick ane: Using a text editor and the Developer Control Prompt to compile
With this option, we are going to compile our programs from the control line (using a program called the "Developer Command Prompt") rather than using the graphical Visual Studio environment. When we installed Visual Studio Community, this as well installed the command line tools that we need.Editing the source lawmaking
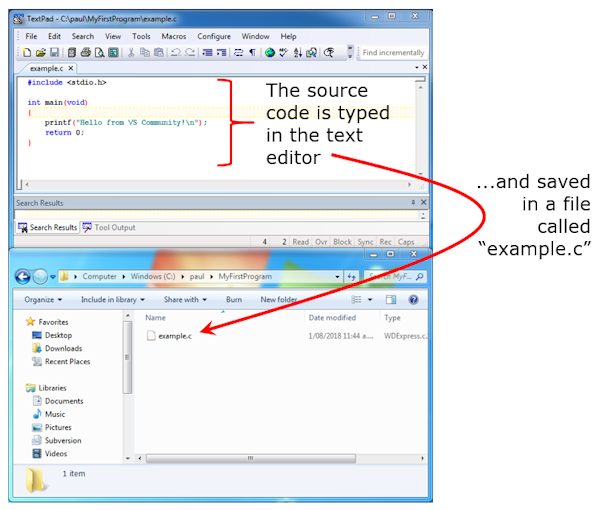
Nosotros can write our source code in any text editor we like. In this example, I am using a text editor called TextPad, and you can see in the diagram beneath that I take created a C source file chosen "example.c" within a binder called "MyFirstProgram" which is inside a directory called "paul" on the "C:" of my computer:
Compiling and running the program
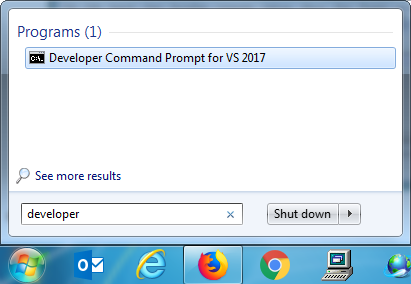
To compile our program, we are going to run the Visual Studio command line compiler, called "cl". We run this command from an surround chosen the "Developer Command Prompt". To launch the Visual Studio "Developer Command Prompt", type "Developer" into the search box in the Showtime menu and you should encounter an choice "Developer Command Prompt for VS 2017" appear every bit shown. Click on this plan:
Yous should see a new window open up - and the title of the window should be "Developer Control Prompt for VS 2017". This is the window into which nosotros volition type the commands to compile and execute our C program.

From the Programmer Control Prompt, you alter directories past typing:
- cd / (to move to the top, or root level, of the directory tree) or
- cd .. (to motion up ane level in the directory tree) or
- cd DIR_NAME (to move downwardly one level into the directory named "DIR_NAME")
You can change drives by typing the drive letter on its own (for example, to switch to the "E" drive or "E:"):
- E:
You tin can list all of the files in the current directory past typing:
- dir
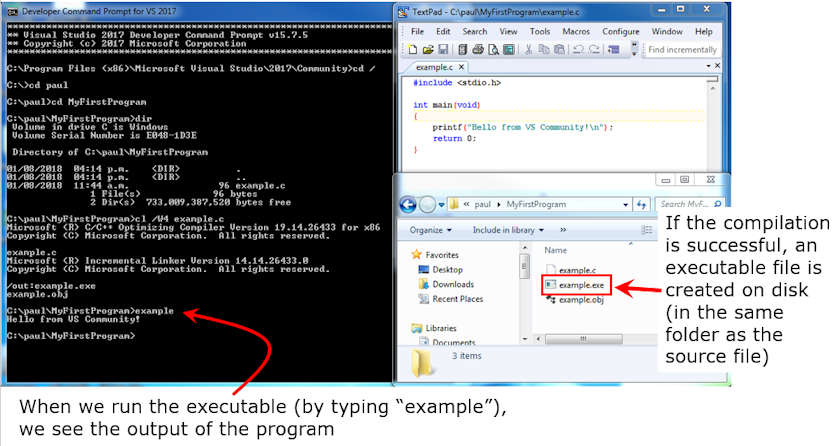
And finally, you tin compile your source file with the control:
- cl /W4 case.c
In this example, "example.exe" is the name of the executable file that will be created if your lawmaking compiles successfully. In the screenshot beneath, you can meet that a new file called "case.exe" was created in the same directory as the source file.
To run the executable, yous simply type:
- case
which means: "execute the program named "example" which is in the current directory
These commands are illustrated below:
And that'due south it - you tin now edit the source file, re-compile the lawmaking, and run the program again!
Expert luck!
Pick 2: Using Visual Studio Customs as your evolution environment
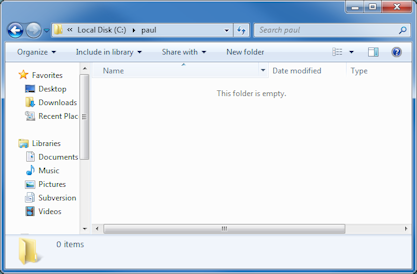
Visual Studio Community is an integrated development environment. This means we can write our source code, compile the code, run the executable and view the output all from inside the Visual Studio program. We are now going to wait at how to do this. Visual Studio organises programs into what it calls "Projects". Then we are going to create a new Visual Studio project in a binder called "paul" on the "C:" of our estimator. As you can see at the moment, this folder is empty:
Offset, we launch Visual Studio Community from the Start menu:
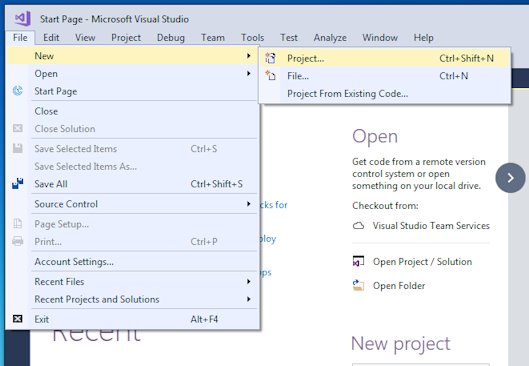
And we create a new project by selecting "File > New Project..."
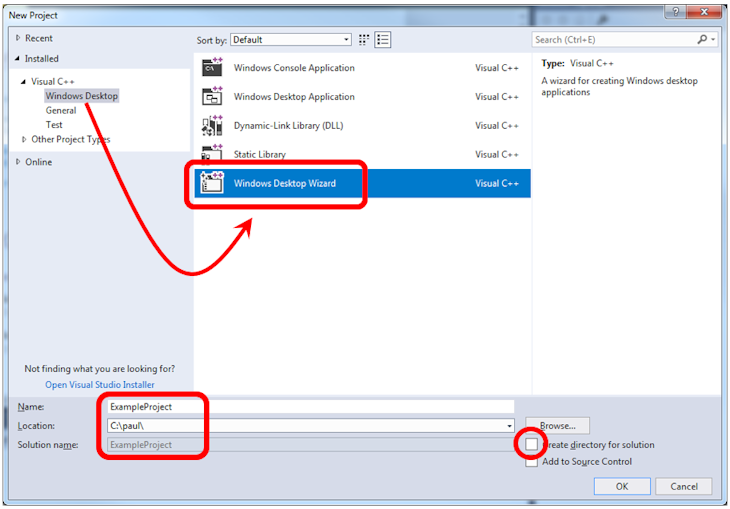
Make sure you carefully select the correct template. This should be "Windows Desktop Magician" which can exist found by selecting "Windows Desktop" underneath the "Visual C++" template.
As yous can see in this example, nosotros have called the project "ExampleProject", and we have selected the location to be the folder "C:\paul". Too, we have left the choice to "Create directory for solution" unchecked:
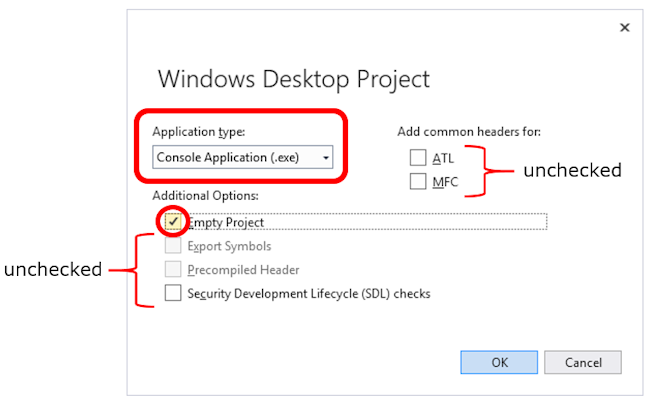
We are then shown the Windows Desktop wizard which allows usa to configure our new project. We must make sure that the Application type is Console Awarding (.exe). Nosotros must as well create an "empty" projection (and get out "Export Symbols", "Precompiled Header" and "Security Development Lifecycle checks" all unchecked). In one case this is correct, then click on "OK"
The project will so be created, and you volition exist shown a graphical representation of the project. This is illustrated below. Because the project is empty, the starting time thing we must do is add a source file:
![]()
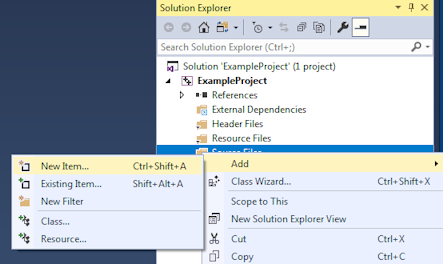
Nosotros can add a source file by correct-clicking the "Source files" item (in the Solution Explorer pane) and then selecting "Add > New Item..."
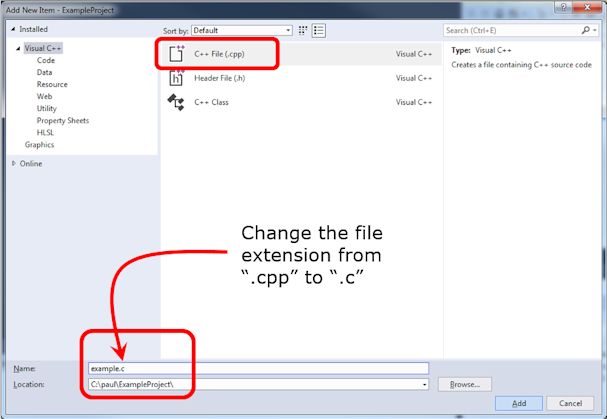
When we create our source file, information technology is very important that we give information technology the correct extension (i.e. suffix) for a C file. This must be ".c":
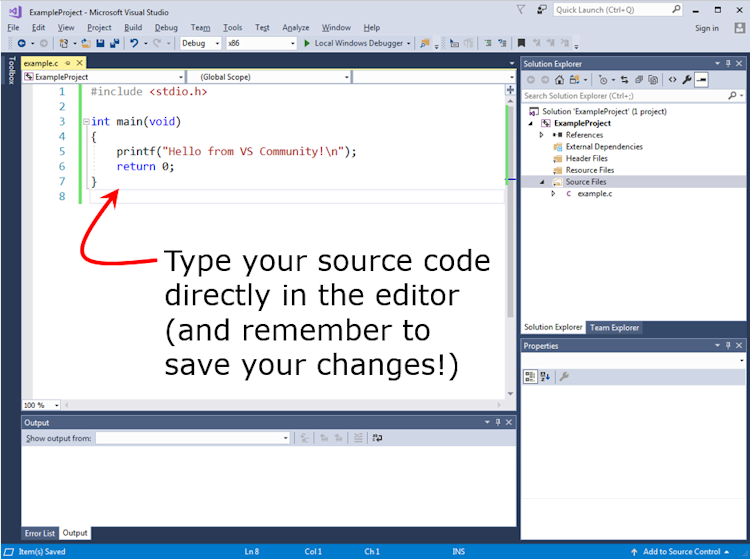
Nosotros can then edit our source file by writing code directly in the Visual Studio Customs lawmaking editor:
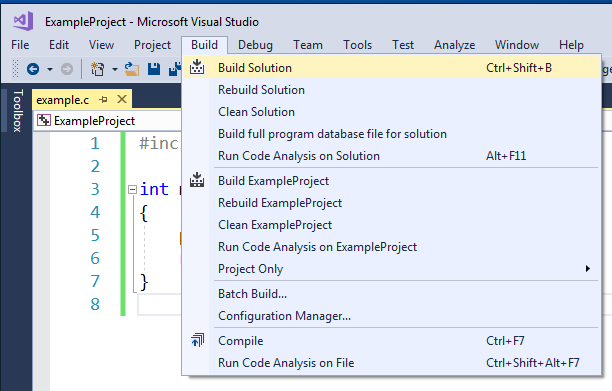
When we are ready to compile our source file, we can select "Build Solution" from the "Build" menu:
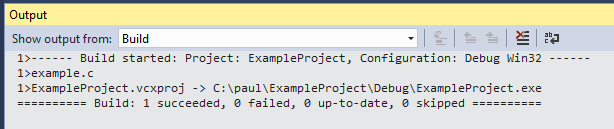
It is useful to have the "Output" pane open up - in the diagram below, the "Output" pane displays the status of the compilation process. In this instance, the compilation succeeded with no errors:
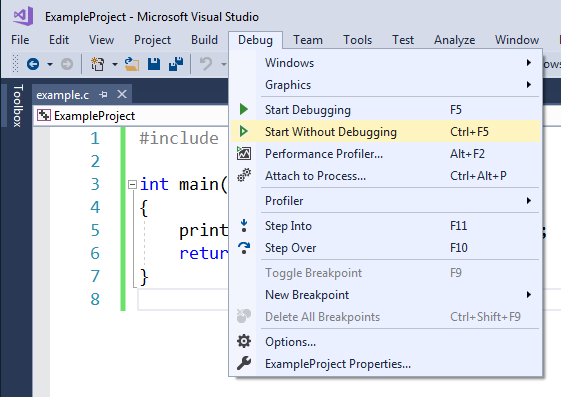
After our code has compiled successfully, we tin then run our program. The best way to practice this is to select "Start without debugging" from the "Debug" menu. This "Offset without debugging" option will add a pause once our programme has executed, allowing u.s.a. to view the output (until we press a key) earlier the window closes:
And, if all has gone well, we will see the output from our plan in a new command window:

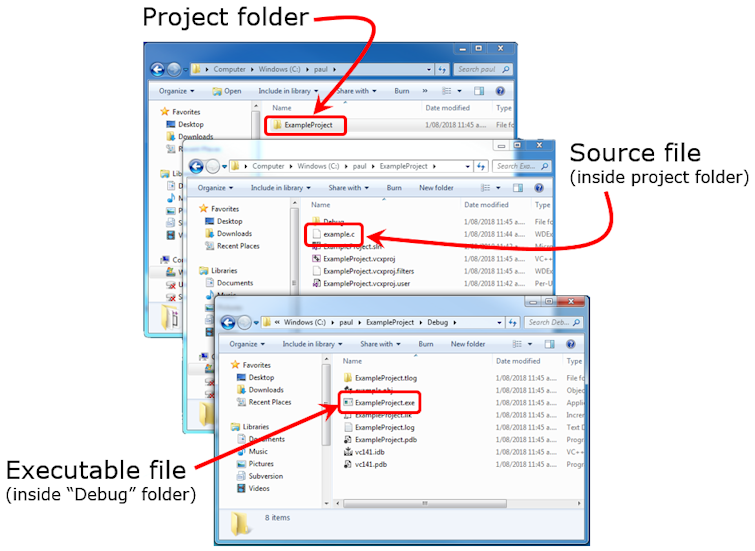
Information technology is really very useful to take an understanding of the files that Visual Studio creates and where these files are stored on disk. If you have followed the suggested organisation described here, then the folder in which we created the projection (which, in this example, was "C:\paul") will contain just a unmarried folder with the proper noun of the project.
Inside this "ExampleProject" folder, there volition be several files, including our source file, "case.c". One of the folders inside the "ExampleProject" is called "Debug".
The "Debug" folder is where the actual executable file for our program is created by the compiler. The diagram beneath illustrates the organization on disk.
Now, if you want to make changes to your program, you lot return to the editor and change the source file. To run the programme again, you must recompile it ("Build solution") and then run it ("Start without debugging").
And that's all there is to it! Proficient luck!
Source: https://www.cs.auckland.ac.nz/~paul/C/Windows/index.php
Posted by: chapmanorry2001.blogspot.com
0 Response to "How To Code C++ On Windows"
Post a Comment